By senzeal-auto.com | 21 October 2019 | 0 Comments
Honda Accord: Fuse Box Diagram
Honda Accord: Fuse Box Diagram
If you have ever burned a fuse, you will know how confused you are when trying to understand everything. Check out the Honda Accord's fuse box guide to help you figure out what fuse does.
This article applies to the Honda Accord (1990-2002).
Opening the fuse box can be confused. There are usually dozens of color fuses, which vary in size and use. The fuse inevitably explodes at some point and therefore needs to be replaced. Although replacing the fuse is an easy task, the challenge is to determine which fuse is bad or why it will go out. Whether the meter is off or the stereo stops working, the fuse blows up and causes various problems. This guide will help you identify the fuse that is causing the problem.
Fuse box diagram
The first thing you need to do is to find a fuse box diagram for your specific year, brand and model. The following figure will list each fuse and its role, which will help you find the culprit.
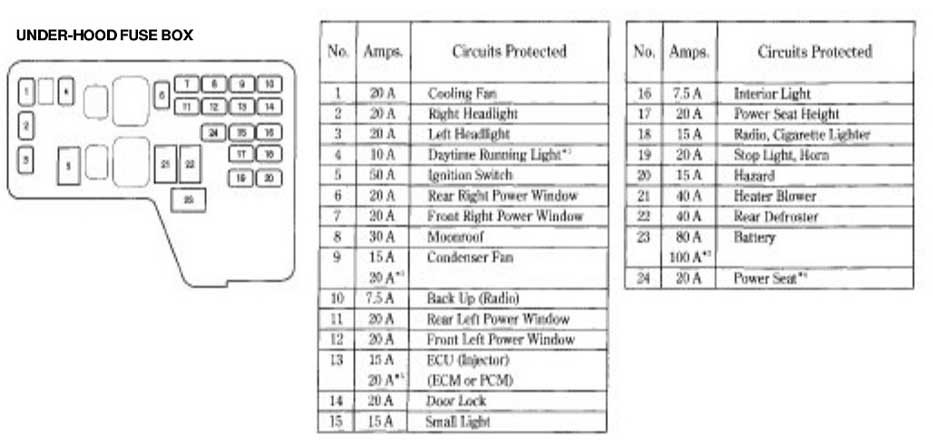
Figure 1. Under the hood fuse box diagram for the 1997 and below Accords.
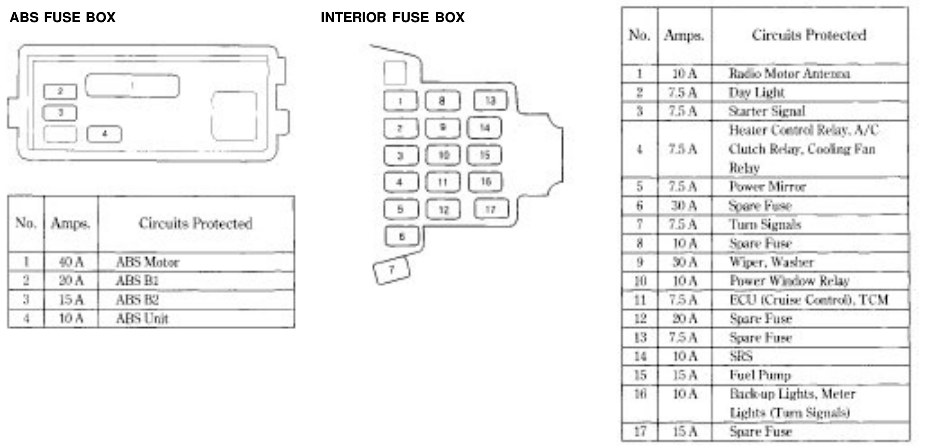
Figure 2. ABS and interior fuse box diagram for the 1997 and below Accords.
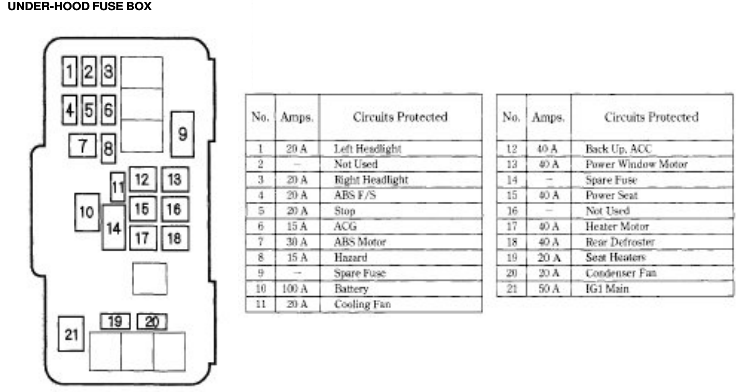
Figure 3. Under the hood fuse box diagram for the 1998 and above Accords.
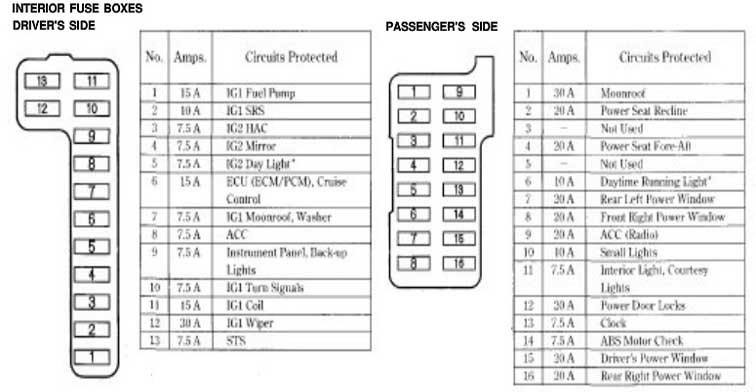
Figure 4. Driver's and passenger's interior fuse box diagram for the 1998 and above Accords.
Test fuse
Once you have found a fuse that may be faulty, pull it out and inspect the center. If the metal piece at both ends of the connection is damaged or burnt out, the fuse may be damaged. If you pass the visual test, continue to test the fuse with a multimeter or test light. First, set up the meter to measure the DC voltage. After installing the fuse in the fuse box, insert the positive (red) meter probe into the left side of the test tab. Then, place the negative (black) probe of the meter on the metal chassis. Finally, test the right side of the Tests tab in the same way.
If the readings on both test tabs are around 12.5 volts, the fuse is receiving voltage from the battery and the fuse is not blown. If the voltages on both sides are different, the fuse is blown and needs to be replaced. If it reaches 12.5 volts on only one test tab, the fuse blows and should be replaced. If the voltage on both test cards does not reach 12.5 volts, the fuse does not get voltage from the battery. Further testing is needed to determine why the fuse does not draw energy from the battery.
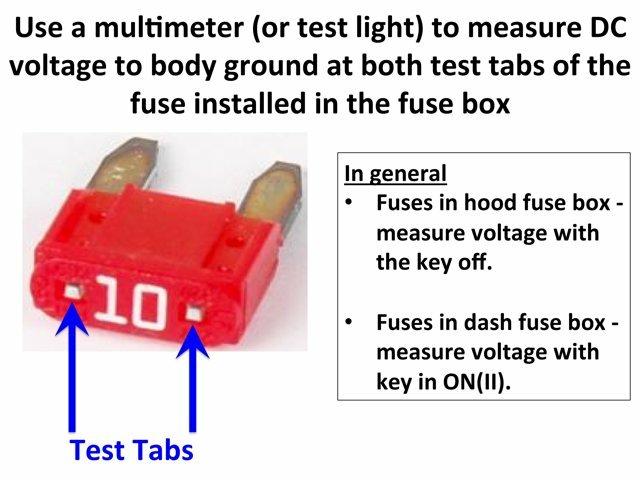
Figure 5. Location of the test tabs.
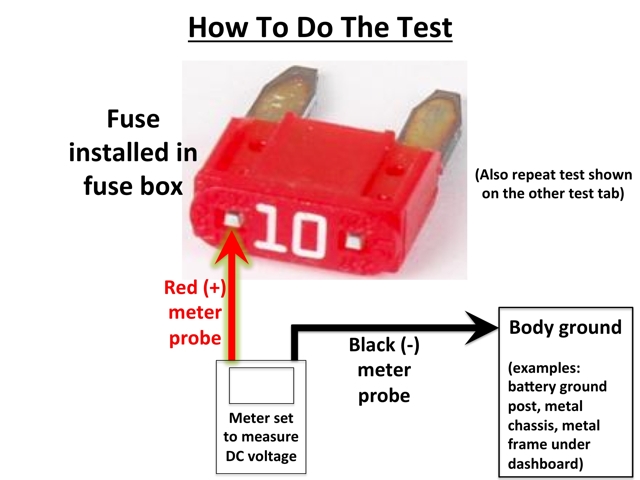
Figure 6. This diagram details how to test a fuse.
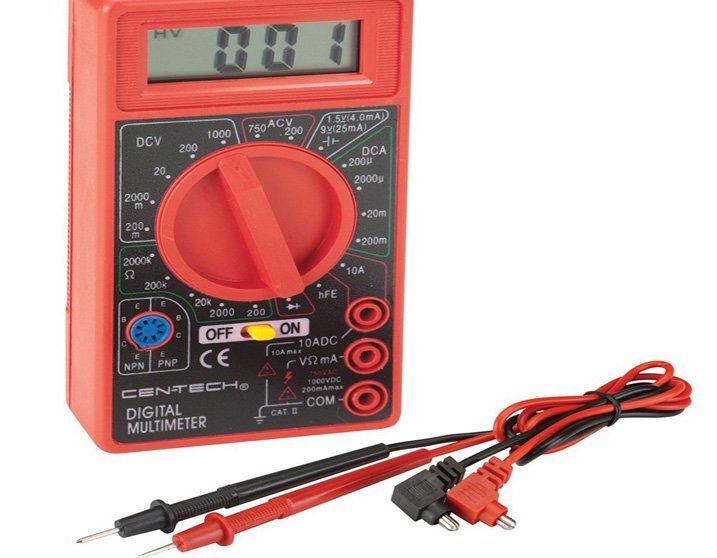
Figure 7. The multimeter is security and inexpensive when dealing with fuses.
Go to the following and seek more Interior Accessories products for your car: https://senzeal-auto.com/c/interior-accessories-0372
If you have ever burned a fuse, you will know how confused you are when trying to understand everything. Check out the Honda Accord's fuse box guide to help you figure out what fuse does.

This article applies to the Honda Accord (1990-2002).
Opening the fuse box can be confused. There are usually dozens of color fuses, which vary in size and use. The fuse inevitably explodes at some point and therefore needs to be replaced. Although replacing the fuse is an easy task, the challenge is to determine which fuse is bad or why it will go out. Whether the meter is off or the stereo stops working, the fuse blows up and causes various problems. This guide will help you identify the fuse that is causing the problem.
Fuse box diagram
The first thing you need to do is to find a fuse box diagram for your specific year, brand and model. The following figure will list each fuse and its role, which will help you find the culprit.

Figure 1. Under the hood fuse box diagram for the 1997 and below Accords.

Figure 2. ABS and interior fuse box diagram for the 1997 and below Accords.

Figure 3. Under the hood fuse box diagram for the 1998 and above Accords.

Figure 4. Driver's and passenger's interior fuse box diagram for the 1998 and above Accords.
Test fuse
Once you have found a fuse that may be faulty, pull it out and inspect the center. If the metal piece at both ends of the connection is damaged or burnt out, the fuse may be damaged. If you pass the visual test, continue to test the fuse with a multimeter or test light. First, set up the meter to measure the DC voltage. After installing the fuse in the fuse box, insert the positive (red) meter probe into the left side of the test tab. Then, place the negative (black) probe of the meter on the metal chassis. Finally, test the right side of the Tests tab in the same way.
If the readings on both test tabs are around 12.5 volts, the fuse is receiving voltage from the battery and the fuse is not blown. If the voltages on both sides are different, the fuse is blown and needs to be replaced. If it reaches 12.5 volts on only one test tab, the fuse blows and should be replaced. If the voltage on both test cards does not reach 12.5 volts, the fuse does not get voltage from the battery. Further testing is needed to determine why the fuse does not draw energy from the battery.

Figure 5. Location of the test tabs.

Figure 6. This diagram details how to test a fuse.

Figure 7. The multimeter is security and inexpensive when dealing with fuses.
Go to the following and seek more Interior Accessories products for your car: https://senzeal-auto.com/c/interior-accessories-0372
Leave a Reply
Your email address will not be published.Required fields are marked. *